
Installing ePipe |
|
||||||||
This chapter will help you install your ePipe hardware or software. The chapter contains the following sections:
Whether installing the software or hardware models of ePipe ML-IP gateway and concentrators, the best place to start is with the appropriate Getting Started Guide. The Getting Started Guides cover the equipment included in the kit, how to connect and install the equipment or software and how to get started. The rest of this chapter should be read as an aid in the installation process.
In general terms, the installation takes the following path:
For more information on configuring the ePipe ML-IP gateway or concentrator, refer to the chapter on configuring ePipe in this user guide.
To get started, follow the instructions in the printed Getting Started Guide included with the product. Alternatively, print the appropriate Getting Started Guide from the list below.
| NOTE: | The PDF versions of the Getting Started Guides use a layout designed for printing. Some of the pages may appear upside down because of this. It is recommended that these guides be printed for ease of use. |
Once you have completed the steps in the Getting Started Guide, you should be ready to proceed to configuring the ePipe. The following sections provide further information that may be useful during the installation process or as background information on the installation process.
The ePipe 2344 is a desktop Internet gateway device or appliance and is designed to sit on a flat horizontal surface or can be wall mounted. The ePipe 2344 can also be placed on shelves in a standard computer or communications closet or rack.
Similar to most devices of its type, the ePipe 2344 should be used in a well ventilated environment which is not prone to extremes of temperature or humidity.
The vertical wall mounting slots can be used with standard flat-head screws for mounting on walls or other surfaces. When mounting, ensure that the screws and wall will hold the weight of the ePipe and any attached cabling. The diagram below shows the location of the wall mounting slots on the base of the unit.
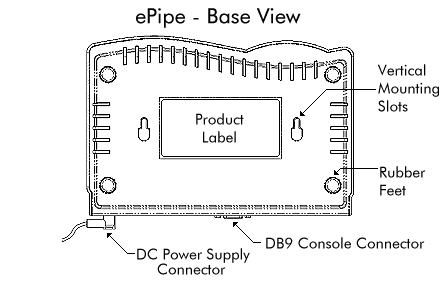
Use a minimum of No. 8 screws and anchors of a minimum of 3/4 inch in length when mounting the ePipe to plaster board surfaces. For other types of surfaces, use suitable screws and fasteners to secure the ePipe.
Ensure the cables attached to the ePipe do not overly pull the ePipe away from the wall or mounting surface. Also ensure the cables are more than long enough to reach the distance between the ePipe and the other device so that the tension in the cable is not too great.
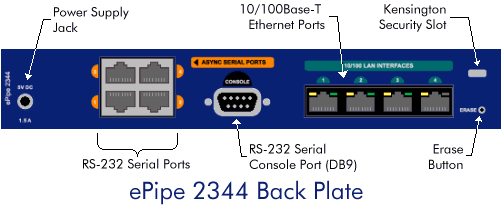
The ePipe 2344 is designed to connect an end user's network or LAN to the Internet. There are four (4) Ethernet ports on the ePipe 2344. Only Ethernet 1 is designed to be connected to the LAN. All other Ethernet ports should be used for connecting the ePipe 2344 to the Internet or other external WAN.
Ethernet 1 on the ePipe 2344 should be connected to an Ethernet hub or Ethernet switch that supports either 10 or 100 Mbps speeds using a standard straight through Cat 5 or better patch lead.
Like all devices that are used on the Internet and in most private networks, the ePipe 2344 needs a unique IP address so that it can be configured and then can connect to the Internet or other networks.
Refer to the diagram below for a description of the ePipe 2344's back plate and its interfaces, especially the location of Ethernet 1.
|
|
NOTE: | Ethernet 1 on the ePipe 2344 MUST be connected to the internal LAN or private network. All other Ethernet ports can be connected to external network connections or Internet services. |
The ePipe 2344 ships with a pre-defined or default IP address for Ethernet 1. This address is:
Default IP Address for Ethernet 1: 192.168.111.111 Default Subnet Mask for Ethernet 1: 255.255.255.0
All other Ethernet ports are configured using the ML-IP Manager. See Configuring ePipe for further information.
If this address is not appropriate for your network, the address of Ethernet 1 will need to be changed.
Once the ePipe 2344 is physically connected to the LAN, the IP address of Ethernet 1 can be changed using the DB9 console port. Access to the console is via the supplied black DB9 to DB9 console cable. Connect this cable to the console port on the ePipe and to an available COM (serial) port on your PC or laptop.
To access the console you will need the following:
If you have some other terminal emulation software then this may be used in preference to HyperTerminal at the user's discretion.
Start HyperTerminal and connect to the COM port attached to the ePipe. You will need to configure HyperTerminal (or other terminal emulation software) using the following RS-232 serial communication settings:
| Setting | Value |
| Speed (baud rate) | 9600 bps |
| Character Size | 8 |
| Stop Bits | 1 |
| Parity | none |
| Flow Control | Software (XON/XOFF) |
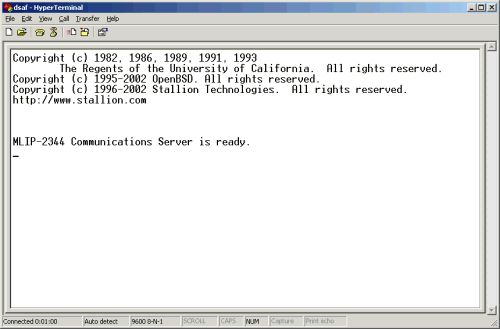
Once HyperTerminal is connected to the ePipe (see the status bar), power cycle the ePipe to see the boot messages (refer to the diagram below).
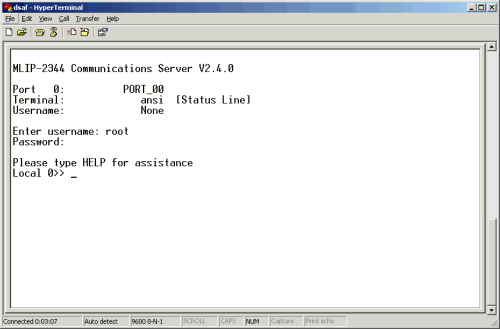
You can now login to the console to change the IP address of Ethernet 1. Press the [Enter] key once. You should see a login prompt appear. You will need to login as the "root" user with the appropriate password. By default the password for the "root" user is "system". Login using these values.
You should see a screen like the one below once you have logged in.
|
|
NOTE: | The root user is the administrative or super user for the ePipe. The default password for the "root" user is "system". You should change the default password to something else using the ML-IP Manager. See Configuring ePipe for more information. |
You can now change the IP address of Ethernet 1. At the prompt, use the following command to change the IP address and subnet mask:
DEFINE INTERNET ADDRESS ip_address SUBNET MASK subnet_mask
For example:
DEFINE INTERNET ADDRESS 192.168.111.222 SUBNET MASK 255.255.255.0
You will now need to reboot the ePipe. This can be done by either:
REBOOT
and then pressing the [Enter] key.
Once the reboot has completed, you can login at the console again and confirm the current IP address using the following command:
SHOW ETHERNET
Note that this will show all Ethernet interfaces. Interfaces that are not configured with an IP address will have an IP address of 0.0.0.0.
Ensure that Ethernet 1 has the correct IP address AND subnet mask. If either is incorrect, repeat the command above to define the IP address and subnet mask again and then reboot. Note that a subnet mask of 0.0.0.0 is not correct.
Once the ePipe 2344 has an IP address you are ready to proceed to configuring the ePipe. This will require a PC, called the Configuration PC, to be prepared to access the Multilink IP Manager (the web browser based user interface of the ePipe ML-IP gateway).
Proceed to Starting the ML-IP Manager below.
ePipe ML-IP Concentrator is a software version of the ePipe ML-IP Gateway designed for the termination of many ML-IP tunnels.
To use the ML-IP Concentrator, you will need a PC connected to your LAN with Red Hat Linux installed (see the CD readme.txt file for information on Linux versions supported). This PC will be referred to as the Linux PC and will run the ePipe ML-IP Concentrator software. This PC must have appropriate Ethernet or serial hardware installed and operational under Linux. The recommended hardware specifications are:
| Model | CPU | RAM |
| ePipe ML-IP Concentrator Evaluation | Celeron 800 MHz | 256 MB |
| ePipe ML-IP Concentrator 10 | Celeron 800 MHz | 256 MB |
| ePipe ML-IP Concentrator 50 | Pentium 4, 1.4 GHz | 256 MB |
| ePipe ML-IP Concentrator 100 | Pentium 4, 2 GHz | 256 MB |
All models will require 20 MB of free disk space on the Linux file system.
All models require at least one Ethernet interface to be available for use by the ML-IP Concentrator.
Linux IP Networking must be installed and working
Some of the following will also be required to install or use ePipe ML-IP Concentrator:
A PC connected to the same LAN as the Linux PC for configuring the ePipe ML-IP Concentrator. This PC will be referred to as the Configuration PC and needs to be running the following:
Microsoft Windows (XP or 2000 recommended)
Microsoft Internet Explorer 5 or above
The Java™ Plug-in (i.e. Java™ 2 Runtime Environment). The Java™ Plug-in can be found on the ePipe ML-IP Software & Documentation CD and can also be obtained from the Sun Microsystems Java™ web site (http://java.sun.com/getjava/).
One or more xDSL, Cable, analog or ISDN modems or dedicated access routers for connecting to the Internet or other WAN services.
Appropriate cables to connect your modems and/or routers to the Linux PC.
One or more xDSL or Cable services, analog (PSTN) or digital (ISDN) phone lines or other dedicated connections.
One or more accounts from one or more ISPs for connecting ePipe ML-IP Concentrator to the Internet.
An available port on your Ethernet hub or switch to which you will connect the Linux PC.
Sufficient Ethernet and RS-232 serial ports installed and working in the Linux PC to which the external network or Internet services will be connected.
The ePipe ML-IP Concentrator is software that runs on a Linux PC. The Linux PC should be located in accordance with the manufacturer's guidelines. Generally, avoid areas that are dusty or prone to extremes of heat or humidity. Typically the Linux PC should be located close to a power supply outlet and to any external access devices that need to be connected to the unit, such as DSL, Cable or analogue modems and other access devices such as routers.
The ePipe ML-IP Concentrator software can be connected to a variety of devices via Ethernet interfaces and serial ports. You will typically need one Ethernet port that will be used by the Linux PC, in addition to whatever interfaces are needed for your communications links.
Ethernet 1 of the ePipe ML-IP Concentrator software is a virtual interface, which will be configured to talk to the Linux operating system when the software is installed. The Figure below shows a typical network deployment using a pair of systems running the ePipe ML-IP Concentrator to connect two sites.

The ePipe ML-IP Concentrator software requires a PC running Red Hat Linux (see the CD readme.txt file for information on versions supported), with the networking components installed and working. The ePipe ML-IP Concentrator software runs as a 'virtual machine', which communicates with the Linux operating system via a Linux device called 'tap0'. The 'tap0' device is created during the install routine. The figure below illustrates the ePipe ML-IP Concentrator virtual machine running as an application on a Linux system and shows relationships between the virtual ePipe devices (e.g. Ethernet 2, Serial 3) with the Linux devices (e.g. /dev/eth1, /dev/ttyS1).

Once the Linux PC is connected to your LAN and has an IP address, you are ready to proceed with installing the ePipe ML-IP Concentrator software.
See the ePipe ML-IP Concentrator Getting Started Guide (PDF) for details on how to install the software. Then refer to the chapter on installation for more information on installing ePipe ML-IP Concentrator.
The most important part of configuring the Linux PC, after the ePipe ML-IP Concentrator software is installed and running, is setting up routing. Typically, the default gateway of the Linux PC should be set to the IP address of the ML-IP Concentrator, the IP address of the virtual Ethernet 1 interface entered during the installation process. One way to do this would be to edit the /etc/sysconfig/network file, and add a line which reads:
GATEWAY=x.x.x.x
Where x.x.x.x is the IP address of the ML-IP Concentrator.
In some situations (for instance, if another device is providing Internet connectivity), you may only wish to route traffic destined for certain networks to the ML-IP Concentrator. One way to do this would be to edit the /etc/sysconfig/static-routes file to suit. Please consult your Linux documentation for more information.
Other things to consider when setting up the Linux PC are mainly related to network connectivity. For instance, if you have firewall software running on Linux, you should check its configuration to see if it may stop traffic flowing to or from the ML-IP Concentrator via the tap interface (/dev/tap0). This software may be filtering certain types of traffic or, if it is using NAT, could obstruct communication in other ways.
It may also be necessary to check if any applications running on the Linux PC are using large amounts of resources, such as consuming large amounts of CPU time. If that is so, the performance of the ML-IP Concentrator will be reduced.
Once the ePipe ML-IP Concentrator software is installed you are ready to proceed to configuring the ePipe. This will require a PC, called the Configuration PC, to be prepared to access the Multilink IP Manager (the web browser based user interface of the ePipe ML-IP Concentrator).
Proceed to Starting the ML-IP Manager below.
To uninstall an ePipe ML-IP Concentrator, log in to the Linux PC as the root user and run the following command:
/usr/local/sbin/uninstall_mlip
|
|
WARNING: | Running the uninstall command will immediately stop the ePipe ML-IP Concentrator process which will disconnect the Linux PC from the Internet or WAN services provided through the ePipe ML-IP software. |
|
|
WARNING: | Once the uninstall command is executed it will immediately remove the ePipe ML-IP Concentrator configuration files and software binary files from the Linux PC |
Configuring the ePipe, whether it is a hardware gateway (e.g. ePipe 2344) or a model of ePipe ML-IP Concentrator, is achieved through the Multilink IP Manager (or ML-IP Manager). The ML-IP Manager is the user interface of the ePipe ML-IP software and is accesses using a web browser which is Java enabled.
The ML-IP Manager is accessed from a web browser on a PC connected to the same LAN as Ethernet 1 of the ePipe or, in the case of the ML-IP Concentrator, the same LAN as the internal Ethernet interface of the Linux PC. This PC is called the Configuration PC. Refer to the figure below.
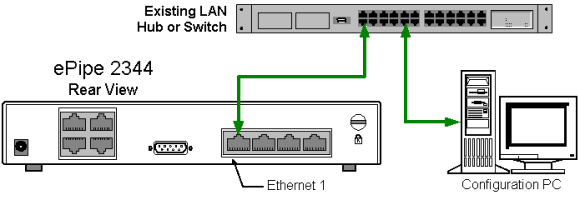
The Configuration PC is used to configure the ePipe using the ML-IP Manager. This requires the Configuration PC to have the following installed:
Configuration of the ePipe is achieved by using a web browser to access the Multilink IP Manager. The ML-IP Manager requires the Java™ Plug-in (or Java™ Runtime Environment) to be installed for use with Microsoft Internet Explorer.
At the time of writing, the latest version of the Java™ Plug-in was version 1.4.0. This version is included on the ePipe ML-IP Software and Documentation CD. To install the Java™ Plug-in, follow the steps in the appropriate Getting Started Guide.
The latest version of the Java Plug-in ca be obtained from the Java web site (http://java.sun.com/getjava/). Once the Java Plug-in is installed, restart Internet Explorer before attempting to access the ML-IP Manager.
As the ePipe ML-IP Concentrator, and therefore the ML-IP Manager, is accessible through the Linux PC, the Configuration PC will need a route to the ePipe ML-IP Concentrator. This is most easily achieved by setting the default route of the Configuration PC to the IP address of the Linux PC. This will allow the Configuration PC to route packets to the Linux PC when the packets are destined for the ePipe ML-IP Concentrator.
To configure the ePipe, start Internet Explorer and browse to the IP address of Ethernet 1 on the ePipe. In the case of ePipe ML-IP Concentrator, this IP address is the address of the virtual Ethernet 1 which was configured during installation of the software in Linux. Your browser should display a page containing a welcome screen (see figure below).
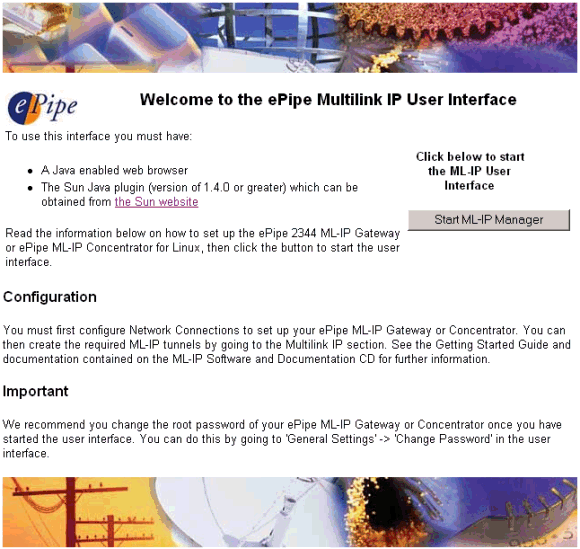
To start configuring the ePipe, click on the Start ML-IP Manager button. See the chapter on Configuring ePipe for more information.
Next: Configuring ePipe
![]()
about ePipe | products | solutions | support | information center | contact us
Copyright © 2002 ePipe Pty. Ltd. All rights reserved.