
Configuring Windows 95/98/ME to establish a VPN tunnel (Point to Point Tunneling Protocol) connection to an ePipe is a straight forward process.
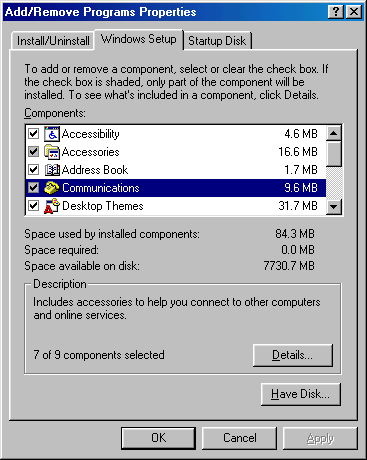
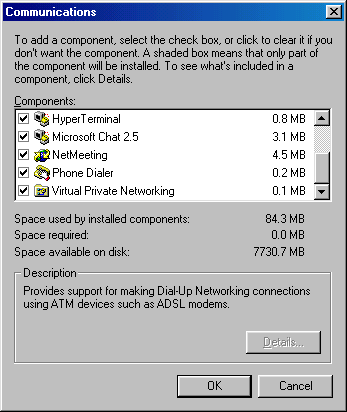
Initially, the settings for your connection to the Internet need to be checked to ensure the SRA VPN to the ePipe behaves as expected. Firstly, check to see if the VPN components for Windows are installed:
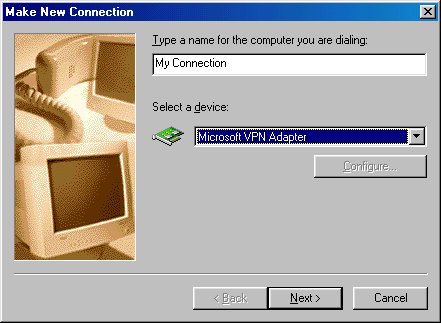
The following procedure for configuring Windows 95/98/ME assumes that a dial up connection to an ISP has already been configured on the client computer.
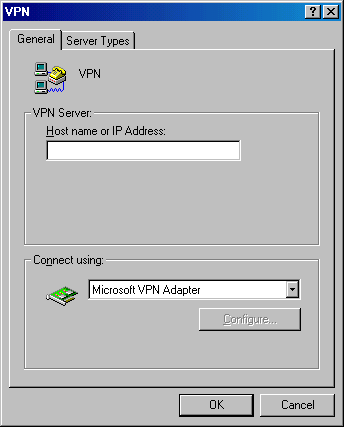
Follow the steps below to configure a PPTP connection:
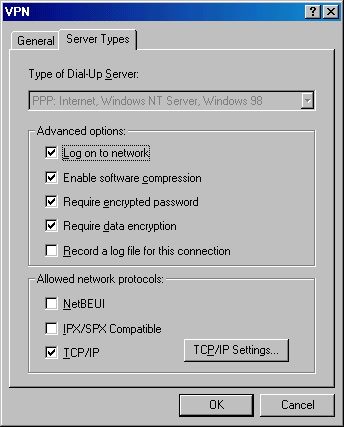
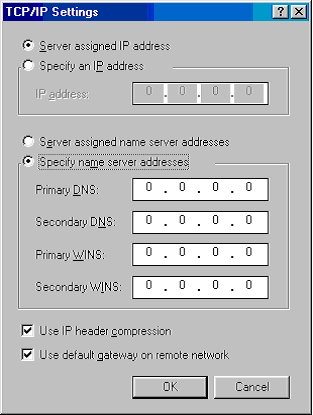
DNS is an acronym for Domain Name System. DNS converts machine names to IP addresses, mapping from name to address and from address to name. WINS (Windows Internet Name Service) is an automated way of supporting NetBIOS name resolution. Both are used to resolve domain name and IP address requests.
To start your PPTP tunnel connection and connect to an ePipe, simply click the previously configured network connection (icon) under Settings -> Network and Dial-up Connections. You will need to connect to your ISP before starting the tunnel.
![]()
about ePipe | products | solutions | support | information center | contact us
Copyright © 2002 ePipe Pty. Ltd. All rights reserved.
![]()
Getting started guides for:
![]()
![]() 2344
(1.4M pdf)
2344
(1.4M pdf)
![]()
![]() ML-IP
Concentrator (1.3M pdf)
ML-IP
Concentrator (1.3M pdf)
![]()
![]() 2202
(1.4M pdf)
2202
(1.4M pdf)
![]()
![]() 2242
(1.4M pdf)
2242
(1.4M pdf)
![]()
![]() 2148/2188
(350KB pdf)
2148/2188
(350KB pdf)
![]()
![]() 2181
(1.4M pdf)
2181
(1.4M pdf)
![]()
![]() ePipe
ServerWare (650K pdf)
ePipe
ServerWare (650K pdf)
![]()
User Guides for:
![]()
![]() ML-IP
Family
ML-IP
Family
![]()
![]() VPN
and Security Family
VPN
and Security Family
![]()
Utilities for viewing guides:
![]() Get
Acrobat Reader (free)
Get
Acrobat Reader (free)![]()